What is VMware Snapshot?
VMware Snapshot preserves the state and data of a virtual machine at a specific point in time. Snapshot state includes the virtual machine’s power state (ex, powered-on, powered-off, suspended) and the data includes all of the files (disks, memory, and other devices, such as virtual network interface cards.) that make up the virtual machine. Snapshots extremely simplify the Virtual Machine OS management and maintenance tasks by preserving the current state of the virtual machine. So it allows you to revert to the state before the snapshot is taken.
Windows patching in Physical Server VS VMware Virtual machine
Physical workload
Before performing the OS patching or software upgrade, You need to take a backup such as OS Image level backup to restore the OS in case of any corruption is happened during the patching and also it is a time-consuming process. Restore is not even guaranteed recovery if in case of the backup file is corrupted.
Before performing the OS patching or software upgrade, You need to take a backup such as OS Image level backup to restore the OS in case of any corruption is happened during the patching and also it is a time-consuming process. Restore is not even guaranteed recovery if in case of the backup file is corrupted.
VMWare Virtual machine
In VMware Virtual Machine, Snapshots simplifies the process to capture the Point-in-time copy of the virtual machine without the need of any third party backup software. It also allows you to take multiple snapshots to preserve the multiple states of the virtual machine. It also simplifies the restore process. You just need to select the snapshot which is taken before patching to revert to the particular state of the virtual machine in case any issue happened during the patching.
In VMware Virtual Machine, Snapshots simplifies the process to capture the Point-in-time copy of the virtual machine without the need of any third party backup software. It also allows you to take multiple snapshots to preserve the multiple states of the virtual machine. It also simplifies the restore process. You just need to select the snapshot which is taken before patching to revert to the particular state of the virtual machine in case any issue happened during the patching.
How to Create VMware Snapshot
VMware Snapshot can be simply created using vSphere client connected to ESXi host or vCenter Server and through vSphere web client. Even VMware snapshots can be created using the command line and powerCLI scripts. Let’s take a look at how to create Virtual Machine Snapshot from vSphere Web Client.
Connect to your vCenter server using vSphere Web Client and Right-click the virtual machine -> Take Snapshot

Name: Specify the name for the snapshot. Name of the snapshot should understandable easily from its name.
Description: Provide a description for this snapshot. You can even specify the Date and time to best identify its age.
As of now, Just go with the snapshot without Virtual Machine memory. I will explain the difference between the VMware snapshot with Virtual Machine’s memory and Snapshot without Virtual Machine’s memory. Click Ok to create the snapshot.
As of now, Just go with the snapshot without Virtual Machine memory. I will explain the difference between the VMware snapshot with Virtual Machine’s memory and Snapshot without Virtual Machine’s memory. Click Ok to create the snapshot.

You can validate that the “Create Virtual Machine Snapshot” tasks under your recent tasks in vSphere Web Client. It is completed and Snapshot is created.

Difference between VM Snapshot with and without Virtual Machine Memory
Snapshot with Virtual Machine Memory
If you select the checkbox “Snapshot the virtual machine’s memory” during snapshot creation, Then memory flag will be set to 1 or true, a dump of memory state (internal state) of the virtual machine is also included in the snapshot.
It takes little longer time to create the memory snapshot as compared to snapshots with memory. Virtual Machine needs to be Powered on state to take the memory snapshot. If the virtual machine is in powered off state, Memory snapshot option will be grayed out. This memory snapshot will allow you to restore the virtual machine to the same state as it was when a snapshot was taken. In Simple terms, it captures the live state of the virtual machine
For Example, you are modifying a Microsoft word Document file and memory snapshot is taken at that time. After some time VM goes into Blue screen. You want to restore the snapshot from the memory snapshot taken prior to the blue screen issue. Snapshot with memory will revert the VM into powered on state along with the opened MS word file.

Snapshot without Virtual Machine’s Memory option:
Snapshot taken without memory option will not capture the live stateof the virtual machine. Snapshot creates crash consistent disks, which you can be used to restore the virtual machine to the state prior to the snapshot but it won’t revert the VM into same power state as it during snapshot creation. Virtual Machine can be either in Powered on or Powered off state to take VM snapshot without memory option.
Let’s say I have taken a snapshot when the virtual machine is powered on and before the patch upgrade. After I revert back to the snapshot taken without memory, the Virtual machine will be restored to the same data and state but power state of the virtual machine won’t be Powered on. It will be powered off. You need to manually power on the VM after reverting the snapshot.

VM Snapshot with Quiesce Guest File System
If you select the option “Quiesce guest file system” when taking snapshot, <quiesce> flag is 1 or true, It quiesce the file system in the virtual machine. Quiescing a file system is a process of bringing the on-disk data of a physical or virtual computer into a state suitable for backups. This process might include such operations as flushing dirty buffers from the operating system’s in-memory cache to disk, or other higher-level application-specific tasks. The virtual machine needs to be “powered on” State to take a snapshot with the quiesce file system option and also it requires VMware Tools to be installed on the Guest OS to quiesce the file system in the virtual machine.
Note: Quiescing indicates pausing or altering the state of running processes on a computer, particularly those that might modify information stored on disk during a backup, to guarantee a consistent and usable backup. Quiescing is not necessary for memory snapshots; it is used primarily for backups.

How does VMware Snapshot work?
- When you initiate the request to create, delete or revert snapshot operation via client (Web Client, vSphere Client or Power CLI), Request will be sent from the client to Server using VMware API
- Snapshot create, delete or revert request will be forwarded to the ESXi host where that particular virtual machine is running. This process will happen only when initiating the snapshot create, delete or revert request from vCenter Server. This will be skipped if you sent create snapshot request by directly connecting to the ESXi host.
- If you select Snapshot with Virtual machine’s memory option, ESXi hostwrites the memory of the virtual machine to the disk. the virtual machine is stunned throughout the duration of time the memory is being written.
- If you select snapshot with the quiesce guest file system option, the ESX host requests the guest operating system to quiesce the disks via VMware Tools. Depending on the guest operating system, the quiescing operation can be done by the sync driver, the vmsync module, or Microsoft’s Volume Shadow Copy (VSS) service.
- ESXi host makes the modification to the virtual machine’s snapshot database file (.vmsd) and it reflects the changes in the snapshot manager of that virtual machine
- ESXi host calls Virtual DISK API functions to make changes to the child disks (-delta.vmdk and .vmdk) files and to the disk chain.
When you create a snapshot, The state of the virtual disk at the time of snapshot is preserved and writes to the VMDK file is not allowed. The system creates an additional VMDK file called delta disk for each VMDK disk in the datastore and allows to write any changes to that delta disk. The delta disk represents the difference between the current state of the virtual disk and the state that existed at the time the previous snapshot was taken.
If multiple snapshots are taken, Delta disks will be created for each of VM disk of the every snapshot and it can represent the difference between each snapshot.
When you delete the snapshot, The changes between snapshots and the previous disk states are merged and all the data from the delta disk that contains the information about the deleted snapshot is written to the parent VMDK disk. The amount of time it takes to commit or delete snapshots depends on how much data the guest operating system has written to the virtual disks since the last snapshot was taken.
Virtual Machine Snapshot Files
Virtual machine snapshot consists of multiple files. Virtual Machine snapshot mainly includes the following:
- Settings state : Virtual machine’s settings (.nvram & .vmx) and power state
- Disk State: state of the virtual machine’s associated disks
- Memory state: Contents of virtual machine’s memory (Only if memory snapshot is selected)
Below are the some of the files which comprise of snapshot:
- VM_name.vmsd
- VM_name-snasphot#.vmsn
- VM_name-00000#.vmdk
- VM_name-00000#-delta.vmdk
- VM_name-snapshot#.vmem
Below is the comparison of Virtual machine files in the virtual machine directory before and after creating the first snapshot of the virtual machine.

You can see the Delta disk information from the SSH session of ESXi host when browsing towards the virtual machine directory.

Let’s discuss in detail about the what does each of the snapshot file means and purpose of the each file.
.vmsd
- VM_name.vmsd is the snapshot list file and is created at the time that the virtual machine is created. It will be present in the Virtual machine directory regardless of the snapshot is present or not for that virtual machine.
- The .vmsd file stores the names, description, and relationships for all of the virtual machine’s snapshots.
- It maintains snapshot information for a virtual machine so that it can create a snapshot list in vSphere Web Client. This information includes the name of the snapshot .vmsn file and the name of the virtual disk file.
- You can validate the size of the .vmsd file is grown after the snapshot is taken from the above screenshot which compares the files before and after VMware snapshot creation.

-snasphot#.vmsn
- VM_name-snasphot.vmsn is the snapshot state file and is used to store the state of the virtual machine when a snapshot is taken.
- New .vmsn will be created for every snapshot and will be deleted when that snapshot is deleted
- Size of the .vmsn varies based on the option selected during snapshot creation. For example, If you have selected Virtual machine’s memory during snapshot creation, it increases the Size of .vmsn file
- I have 2 snapshots called “Snap_1″ & “Snap_2” for the virtual machine named “Redhat-1”. It has 2 .vmsn files (Redhat-1-snapshot1.vmsn & Redhat-1-snapshot2.vmsn) is created in the virtual machine directory

VM_name-00000#.vmdk
- VM_name-00000#.vmdk is the disk descriptor file. This small text file contains information about the snapshot and snapshot disks.
- It gets created for each of the VMDK file, when you take the snapshot. For example, In the below screenshot, I have VM called “Redhat-1” has 2 VMDK’s (Redhat-1.vmdk & Redhat-1_1.vmdk), After taking first snapshot called “Snap_1”, It has created “Redhat-1-000001.vmdk & Redhat-1_1-000001.vmdk” and after second snapshot “Snap_1”, It created “Redhat-1-000002.vmdk & Redhat-1_1-000002.vmdk“

Each VM_name-00000#.vmdk updates the information about its Parent disk information. For example, For the First snapshot, “Redhat-1-000001.vmdk” updated its parentFileNameHint as the actual base disk (actual VMDK file).
After Second Snapshot, “Redhat-1-000002.vmdk” is updated with the ParentFileNameHint as “Redhat-1-000001.vmdk” which is the disk descriptor file created for the snapshot. So for the second Snapshot, Parent is the first snapshot and for the first snapshot, parent is base disk.

When you checked from the virtual machine properties -> Click on Hard Disk -> you can see the Hard disk is mapped with the latest snapshot disk descriptor (VM_name-00000#.vmdk)

VM_name-00000#-delta.vmdk
- VM_name-00000#-delta.vmdk is the delta disk file.
- State of each virtual disk of the virtual machine is preserved when you take a snapshot of a virtual machine.
- Virtual Machine stops writing to its VM_name-flat.vmdk file and all the writes will be redirected to delta disk “VM_name-00000#-delta.vmdk.
- It gets created for each of the flat-vmdk file, when you take the snapshot. For example, In the below screenshot, I have VM called “Redhat-1” has 2 VMDK’s (Redhat-1-flat.vmdk & Redhat-1_1-flat.vmdk), After taking first snapshot called “Snap_1”, It has created “Redhat-1-000001-delta.vmdk & Redhat-1_1-000001-flat.vmdk” and after second snapshot “Snap_1”, It created “Redhat-1-000002-delta.vmdk & Redhat-1_1-000002-delta.vmdk“

VM_name-snapshot#.vmem
- .vmem file will be created only you have selected the option “Snapshot Virtual machine’s memory” during the snapshot creation.
- This file contains the entire contents of the virtual machine’s memory at the time of snapshot creation

Managing VMware Snapshots
Snapshots tab allows you to manage the virtual machine snapshots such as Revert to (Go To), Edit Snapshot, Delete Snapshot, Delete All Snapshots

In the Snapshot tab, you can perform the following actions:
• Edit Snapshot: Edit the snapshot name and description.
• Delete Snapshot: Removes the snapshot from the Snapshot Manager and consolidates the snapshot files to the parent snapshot disk and merge with the virtual machine base disk.
• Delete All Snapshots: Commits all the intermediate snapshots before the current-state icon (You Are Here) to the VM base VMDK file and removes all snapshots for that virtual machine.
• Revert to: Enables you to restore, or revert to, a particular snapshot. The snapshot that you restore becomes the current Snapshot.
We will discuss in In-depth Details of each of the above actions with various Scenarios.
Delete Snapshot
Delete Snapshot operation removes the snapshot from the Snapshot Manager and consolidates the snapshot files to the parent snapshot disk and merge with the virtual machine base disk. Let’s look into the detailed information of Delete Snapshot operation.
I have 2 VM snapshots “Snap_1″ & “Snap_2” for the virtual machine “winsvr”. If I delete the Snapshot “Snap_2”, It will consolidate the snapshot data to its parent snapshot (Snap_1) disk. In this Example, “Snap_1” is the Parent of Snapshot “Snap_2”.
Before Deleting the Snapshot “Snap_2”, Below are the size of the each disks
Base Disk (Winsvr-flat.vmdk) -> 21.4 GB
Snap_1 Delta disk (winsvr-000001-delta.vmdk) -> 2.7 GB
Snap_2 Delta disk (winsvr-000002-delta.vmdk) -> 3.4 GB

To delete the Snapshot “Snap_2” Select the particular snapshot and click on “Delete”

Snapshot “Snap_2” is deleted and now VM has only one Snapshot “Snap_1”

After the Snapshot removal, Snap_2 data (3.4 GB) is consolidated into its parent snapshot disk (Snap_1 delta disk) and Snap_1 Delta disk (winsvr-000001-delta.vmdk) is grown from 2.7 GB to 6.3 GB.


Delete Intermediate Snapshot
When you delete a snapshot one or more levels above “You Are Here”, The snapshot state is deleted and that data will be committed to the virtual machine base disk. Refer the Below example:
If you delete the snapshot “Snap_1”, Snap_1 data (winsvr-000001-delta.vmdk) is committed into the Base disk (winsvr-flat.vmdk) and the foundation for the snapshot “Snap_2” will be retained

Let’s take a look at the step by step demo of deleting Snapshot one or more level above “You are Here” state. I have currently 2 snapshots (Snap_1 & Snap_2) for the virtual machine “winsvr”.
I also have created Folder “File1” before taking snapshot “Snap_1” and also created Folders after creating each of the snapshots.

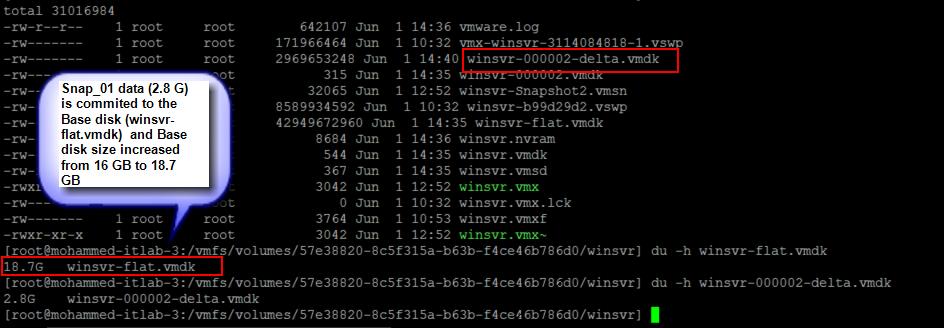
In the below Screenshot, You can notice the 2 delta disks created as part of the Snapshot creation
Base disk -> winsvr-flat.vmdk
Snap_1 -> winsvr-000001-delta.vmdk
Snap_2 -> Winsvr-000002-delta.vmdk
I have also validated the actual usage of each of the above flat.vmdk and delta.vmdk using the below commanddu -h servername-flat.vmdk
or
du -h servername-00000#-delta.vmdk

To delete the Snap_1, Select the “Snap_1” and click on Delete.
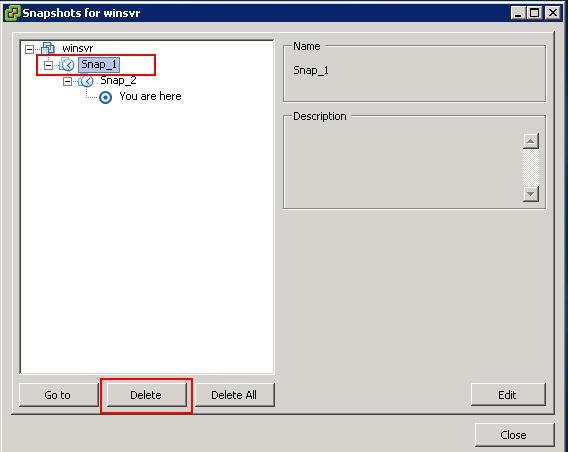
Once the Snapshot “Snap_1” is deleted, I don’t see the “Snap_1” delta disk “winsvr-000001-delta.vmdk”. As we stated earlier, When you delete a snapshot one or more levels above “You Are Here”, The snapshot state is deleted and that data will be committed into the virtual machine base disk.
I have deleted the Snapshot “Snap_1” which had 2.8 GB of data. After the Snap_1 deletion, Snap_1 data is committed into the Base disk (winsvr-flat.vmdk) which was grown from 16 GB + 2.8 GB (Snap_1 data) = 18.7 GB
Delete VM Snapshot below “You are Here”
When you delete a snapshot one or more levels below “You Are Here”, Subsequent snapshots are deleted and you can no longer return to those states. The snap_2 data is deleted.
For example, You have 2 Snapshots (Snap_1 & Snap_2) and your current snapshot is Snap_2, When you revert your virtual machine to snap_1, Snap_2 snapshot data will be deleted and the virtual machine can no longer return to the state of Snap_2.


Delete All VM Snapshots
Prior to vSphere 4 update 2, Delete All Snapshots option from the Snapshot manager would require additional space to perform the operation, incase of committing multiple snapshots. When using Delete All in the Snapshot Manager, the snapshot furthest from the base disk is committed to its parent, causing that parent snapshot to grow. When that commit is complete, that snapshot is removed and the process starts over on the newly updated snapshot to its parent. This continues until every snapshot has been committed. This can lead to an aggressive use of additional disk space if the snapshots are large.
VMware Updated the algorithm of Delete All Snapshots, Delete all snapshots operation to commit every snapshot of the chain directly to the Base Disk(s) of the virtual machine. With this new Delete all algorithm, If the Base Disk is thick provision (pre-allocated), no extra space is required for the Delete all operation. The Base Disk will not grow as it is preallocated or thick. If the Base Disk is thin provision (non-preallocated), the base disk will grow only on committing information from the snapshots. Each thin provision disk may grow up to its maximum size as mentioned in the Provisioned Size option in the virtual machine settings for the disk.
All flat and delta files that are used by the chain of snapshots are locked.

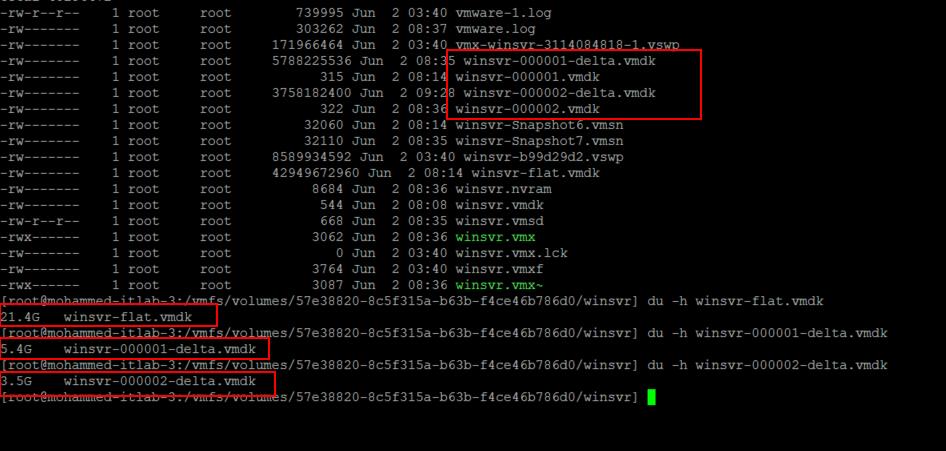
I have 2 snapshots called “Snap_1” & “Snap_2”. You can notice the delta files related to the snapshots. Before performing Delete All opeartion of 2 snapshots. I have checked the actual usage of base disk and each delta disk of both snapshots
Base disk (winsvr-flat.vmdk) -> 23.4 GB
Snap_1 delta disk (winsvr-000001-delta.vmdk) -> 6.8 GB
Snap_2 delta disk (winsvr-000002-delta.vmdk) -> 3.4 Gb

To perform Delete All VMware Snapshot, Click on Delete All.

Once Delete All operation is completed, I can notice that all the snapshot disks are committed to the virtual machine base disk (winsvr-flat.vmdk) and size of the base disk is grown from 23.4 GB to 33.2 GB (6.8 GB Snap_1 data + 3.4 GB Snap_2 data)

Revert to Snapshot
Revert to snapshot will restore your virtual machine to the state that they were in at the time when you took the snapshot. If you revert to the VMware snapshot, your virtual machine will be in the powered off state, unless you took the Memory Snapshot. Reverting the memory snapshot will revert the virtual machine to state and it also maintains the live power state also.
Let’s see the step by step demo to understand the Revert to Snapshot option. I have created a Folder called “File 1” created on the desktop of the virtual machine. File 1 folder is 6.48 GB of Size before taking the snapshot.

I am creating the snapshot called “Snap_1”

Specify the Snapshot name and description. I am taking the memory snapshot of the virtual machine to revert to live state of the virtual machine.

Once the snapshot “Snap_1” is created for the virtual machine, I am deleting the folder “File 1” from the desktop.

I have deleted the folder “File 1”. Let’s revert the virtual machine to the snapshot “Snap_1”. To revert to the snapshot “Snap_1”, Select the snapshot “Snap_1” and Click on “Revert To” to revert to the snapshot.

Click on “Yes” to confirm to revert to snapshot “Snap_1”

Revert to snapshot is completed successfully.

Once Revert to the snapshot “Snap_1” is completed, Virtual machine “winsvr” is reverted to the state when you to took the snapshot. Since I have created a folder “File 1” prior to creating a snapshot. File 1 reappeared on the desktop.

When you revert a virtual machine with snapshot, the current snapshot (delta disk) will be removed and a new one will be created linking to the parent disk.For Example, I have only one snapshot “Snap_1” and it has its delta file called “winsvr-000001-delta.vmdk”. After reverting the virtual machine to snapshot “Snap_1”, winsvr-000001-delta.vmdk got deleted and new delta file called “winsvr-000002-delta.vmdk is created.

Reverting VMware Snapshot One level above the Current Snapshot
Let’s take a look at the Scenario of Revert to the snapshot One level above the current snapshot. For Example, You have a virtual machine with 2 Snapshots “Snap_1” & “Snap_2”. Snap_2 is the current snapshot. This scenario talks about reverting your virtual machine to Snapshot 1 “Snap_1” instead of recent snapshot “Snap_2”.
Let’s revert to the Snapshot 1 “Snap_1”. Select the snapshot “Snap_1” and Click on “Go To” to revert the virtual machine to Snapshot 1.

When reverting to the Snapshot 1 “Snap_1”, All the files, folders and changes made after the Snapshot 1 will be lost. I don’t see any of the folders created after Snapshot 1.

An interesting fact is There is no longer “Winsvr-000002-delta.vmdk” delta file present and New delta file called “Winsvr-000003-delta.vmdk” is created.

Virtual Machine VMDK also mapped with the newly created disk “winsvr-000003.vmdk”

All the active writes to the virtual machine are passed to the newly created virtual machine. You can notice the new delta file 000003-delta.vmdk. The new delta file is growing when new writes are coming. It has grown from 49 MB to 2.8 GB.
Snapshot Consolidation
Snapshot Consolidation is intended to resolve the problems that might occur with the snapshots. Snapshot consolidation is a method to commit a chain of snapshots to base disks when Snapshot manager shows no snapshots exist but the delta files are present in the virtual machine directory on the datatsore.
Snapshot consolidation is a way to clean unneeded snapshot delta files from a datastore. Left out delta files may continue to grow until the virtual machine runs out of datastore space.
With snapshot consolidation, vCenter Server displays a warning when the descriptor and the snapshot files do not match. After the warning is displayed, the user can use vSphere Web Client or vSphere Client to commit the snapshots.

To Perform consolidation, Click on Snapshot -> Consolidate

Click on “Yes” to confirm the consolidated operation.

Limitations of VMware Snapshot
Keeping snapshots for a longer duration than recommended can affect the virtual machine performance and also VM snapshot is not supported for some disk types and VM configured with bus sharing. Let’s understand what is the limitation of Virtual Machine Snapshots:
VMware Snapshot is not supported for raw disks and RDM Physical mode disks. Snapshot is supported for RDM with virtual compatibility mode.
VMware Snapshot does not support for independent disks. Virtual machines with independent disks must be powered off before you take a snapshot. Snapshots of powered-on or suspended virtual machines with independent disks are not supported.

Snapshots are not supported with PCI vSphere Direct Path I/O Devices
VMware does not support snapshot for the guest operating systems that use an iSCSI initiator in the guest.
VMware Snapshots are not supported for a Virtual machine configured withbus sharing.

The virtual machine with VMDK larger than 2 TBs, snapshot operations can take significantly longer to finish.
A snapshot can negatively affect the virtual machine performance and Performance degradation is based on How long you keep the snapshot, depth of the snapshot tree and also based on the write rate of the virtual machine and its guest operating system have changed from the time you took the snapshot.
Snapshots are not meant for the method of backup and recovery. The snapshot only provides Point-in time image. If the files containing a virtual machine are lost, its snapshot files are also lost.
Best Practices for VMware Snapshots
VMware recommends only a maximum of 32 snapshots in a snapshot chain. However, for a better performance, use only 2 to 3 snapshots.
Do not use a single snapshot for more than 24-72 hours. Keeping VMware snapshot for longer duration will negatively affect the virtual machine performance
Snapshot file continuous to grow in size and when keeping snapshot for a longer duration, this can cause the datastore to grow and even sometimes it causes outage due to datatsore space issues.
Ensure Snapshots are deleted after every backup when using third-party backup softwares.
Effectively use vCenter Alarms to monitor the virtual machine snapshot and datastore space usage
You can also make use of PowerCLI script to report the virtual machine usage and also the age of the virtual machine snapshot.
Do Not attempt to increase the disk space of the virtual machine disk, when Snapshot is present. Increasing the disk size, when snapshots are still available can corrupt snapshots and result in data loss.
If you using vSphere version prior to vSphere 5.0, Ensure there are no snapshots prior to performing storage vMotion. Storage vMotion is supported for VM with snapshot after vSphere 5.0
VMware Snapshot Advanced Operations
Exclude Virtual Machine disk from VMware snapshot
We need to set the virtual disk to independent mode to exclude the disk from any snapshots. Power off the virtual machine and delete any existing snapshots before you change the virtual disk mode to Independent. Deleting a snapshot involves committing the existing data on the snapshot disk to the parent disk.
One of the real-time use cases I can think is ORACLE RAC. Basically, in Oracle RAC have multiple disks and it will be shared between the cluster nodes and it will be kind of Multi-writer enabled virtual disks. When performing patching for the ORACLE RAC VM’s, We used to configure all the shared disks as Independent persistent to exclude from the snapshot. So only OS disk will be included as part of snapshot operation.
To configure the virtual disk as Independent disk, Right-click the virtual machine -> Edit Settings -> Virtual Hardware ->Expand the Hard Disk -> Select Independent -Persistent or Independent-Nonpersistent -> Click on OK.

Independent -Persistent: Changes to the disk are immediately and permanently written to the disk as same like a conventional disk in the phsyical computer.
Independent -NonPersistent: Changes to the disk are discarded when you power off or reset the virtual machine. Changes to the disk are written to and read from a redo log file that is deleted when you power off or reset.

Even though I have virtual disks (Hard Disk 1 & Hard Disk 2) in the virtual machine “winsvr”, It created only one delta file for the Hard Disk 1 and no delta file is created for the Hard Disk 2 because it is configured as Independent disk.

Control Maximum of VMware Snapshot Per Virtual Machine
Even though The maximum supported amount of snapshots in a chain is 32, It is recommended not to take more than 2 or 3 snapshots for production virtual machines. How do you control a maximum number of VMware snapshot per virtual machine? Currently, there is no way to control the maximum number of snapshot per virtual machine. There is an undocumented VMX entry as per William Lam’s article, which can control the maximum number of snapshots per virtual machine.
To add the advanced configuration entry to control the maximum number of VMware Snapshot per virtual Machine, Right-click the Virtual Machine -> VM Options ->Edit Configuration

Click on Add Row -> Enter “snapshot.maxSnapshots” in the Filed and Enter the number of snapshots in the unit in the Value column.
snapshot.maxSnapshots = n
In the below Screenshot, I have enter 3 to control the maximum number of the snapshot for the virtual machine to 3.

I already created 3 snapshots for the virtual machine “Winsvr”.

When i tried to created the 4 snapshot for the virtual machine “winsvr”. It throws the error “msg.snapsot.error-MAXSNAPSHOTS”

So we are clear that we are able to control the maximum number of VMware snapshots per virtual machine using this advanced paramenter.
Change default VMware Snapshot location
In ESXi 5.0 and later, virtual disk redolog (-delta.vmdk) files for snapshots are placed in the same directory as the parent virtual disk (.vmdk) file. There are some situations like your VMFS datastore don’t have enough storage to accommodate the vm Snapshot or you may not able to power on the vm due to insufficient space to hold your Swap file in the VMFS datastore. You may need to change the default location of your vm snapshot and point it to the different datastore, where it have enough space to store your snapshot related files (virtual disk redolog (-delta.vmdk)). Specifying the working directory for the virtual machine will ensures that subsequently created vm snapshots cause new virtual disk redolog (-delta.vmdk) files to be created in the defined datastore.
We need to make the advanced configuration entry in .VMX file of your virtual machine. I have written detailed article to change the default snapshot location.
Monitor & Report VMware Machine Snapshots
Creating vCenter Alarm to Monitor VMware Snapshot Usage
In production environment, it is necessary to monitor and report the virtual machine snapshots usage information. I will explain the procedure the configure the vCenter Server alarm to monitor the usage of VMware Snapshot and what actions need to perform when particular alarm is triggered. Let’s see the step by step procedure how to configure vCenter alarm for snapshot usage.
To Configure vCenter Alarm ->Login to the vSphere Web client ->Right-click the object you want to add the alarm -> Navigate to Alarms > New Alarm Definition.

Enter an alarm name and description. Select Virtual Machines from the Monitor drop-down. Select “specific conditions or state, for example CPU usage” in the Monitor for option. Select the checkbox ” Enable this alarm” Click on Next.

In the Trigger Type dropdown, click VM Snapshot Size (GB).

Select “Is above” in the operator and Specify the Size in GB for warning condition and critical condition. Click on Next.

Select the action you want to occur when the alarm is triggered. I am specifying the action to “send a notification email”

Specify the email address to send an notification email. You can specify the frequency of email for each of the change of alarm condition. Specify the duration of the repeat actions. Click on Finish to complete the alarm configuration.

Power CLI Script – Report Virtual Machines with 3 days older VM Snapshots
I have written an excellent article for the PowerCLI script which helps us toreport the Virtual Machines with 3 days older VM snapshots and export the output in Excel (.CSV) file. It is always recommended not to keep VM snapshots more than 24- 72 hours. The VM snapshot file continues to grow in size when it is retained for a longer period. This can cause the snapshot storage location to run out of space and impact the system performance. This PowerCLI script could be really useful to identify the Virtual machines with 3 days older snapshot and delete them immediately or raise a concern to the respective team for the VMware snapshot deletion before VM snapshots causes outage to your production infrastructure.
PowerCLI script provides an output in CSV file in the below format. It provides the VM information, snapshot name and date it is created. It reports the virtual machine with snapshots which is older than 3 days. As per VMware best practices, It is not recommended to keep the snapshots more than 24-72 hours. This script help you to achieve the best practices for VMware Snapshot.

Managing VMware Snapshot from Command Line
vSphere Web Client and vSphere Client were always helpful but we need to also understand how to manage VMware snapshots operation from the ESXi host CLI. In this part, I will explain few of the general snapshot related operations from command line. All the below operations are based on “vim-cmd”. Before performing any operation on the virtual machine, we need to get the vmid of the virtual machine. To get the vmid of the virtual machine, Execute the below commandvim-cmd /vmsvc/getallvms
It will lists the vmid, name of the virtual machine, vmx file location, Guest OS, hardware version and annotation, if any. We need to make note of vmid to perform vmware snapshot related operation on that particular virtual machine.

Get Snapshot Details
To get the Vmware snapshot details of the virtual machine, execute the below command:vim-cmd /vmsvc/snapshot.get <vmid>
vim-cmd/vmsvc/snapshot.get 7
It will list the Snapshot name, Snapshot ID, Snapshot description, Date created on and snapshot state. We need Snapshot ID to any operation related to that snapshot.

Delete Snapshot
To delete the snapshot, first get the snapshot details using “snapshot.get” command and note down the snapshot ID. Execute the below command to delete the snapshot called “Snap_1” and Snapshot ID is “1”.vim-cmd /vmsvc/snapshot.remove <vmid> <snapshot ID>
vim-cmd /vmsvc/snapshot.remove 7 1

Create Snapshot
We can create the snapshot from the command line. Below is the command line format. We need to specify the snapshotname, snapshot descritpion to create the snapshot. Optionally you can specify the snapshot option such as include memory snapshot and Quiesce file system. Use the below command to create the snapshot.vim-cmd /vmsvc/snapshot.create vmid [snapshotName] [snapshotDescription] [includeMemory] [quiesced]
vim-cmd/vmsvc/snapshot.create 7 "snap_1" "snapbefore patching" 1 1

I can also confirm from the vSphere web client that “snap_1” is created from the above command.

Revert to Snapshot
You can also revert to the snapshot from the command line. Execute the below command to revert to the snapshot. You need to specify the vmid snapshot ID and option to suppress the PowerOn of the VM.vim-cmd vmsvc/snapshot.revert <vmid> <snapshot ID> <suppressPowerOn>
vim-vmd vmsvc/snapsot.revert 7 2 1 or 0

Delete All Snapshots
You can perform the Delete All operation from command line as same as vSphere Web client and vsphere client. Just specify the VMID to delete all the snapshot of the virtual machine. No need to specify any snapshot related information.vim-cmd /vmsvc/snapshot.removeall <vmid>
vim-cmd /vmsvc/snapshot.removeall 7
Thats’ it. We are done with Delete All option. It consolidates all the snapshot data to the base disk.

What ‘s new with Snapshot in vSphere 6 & vSphere 6.5
Changes to Consolidation procedure in vSphere 6.0
Prior to vSphere 6.0, Consolidation of virtual machine snapshot will create an additional helper snapshot and all the new I/Os will be redirected to this newly created snapshot. Once all the changes are stored in the snapshot disk have been merged into the base disk, the helper snapshot was also committed. Helper snapshot ill also grow considerably during the consolidation operation. If the time to consolidate the helper is within a certain time-frame (12 seconds), Virtual machine will be stunned and consolidate the helper snapshot into the base disk. If it was outside the acceptable time-frame (12 seconds), then the process will be repeated to create new helper snapshot while consolidation of helper snapshot is happening until the helper could be committed to the base within the acceptable time-frame.
If the Virtual machine has more I/O, This process could never successfully consolidate the snapshot chain and helpers.
In vSphere 6.0, VMware introduced new process for consolidation process which uses the mirror driver (which is same as in the storage vMotion). With this mirror driver mechanism, changes to the virtual machine are written to the active VMDK and the base disk (wile protecting the write order) during consolidation. Snapshot consolidation will be completing now in 1 pass with minimal or indeed no helper disks. Consolidation duration is dramatically shorter stun time of the virtual machine. There is an excellent article from Cormac Hogan talking about this Consolidation changes in vSphere 6.0
Changes to Snapshot Format on VMFS 6 on vSphere 6.5
In vSphere 5.5 & vSphere 6.0, Snapshots taken on VMDK’s larger than 2 TB are Space Efficient Virtual Disk (SESPARSE) format. No user interaction is required. The redo logs are automatically created as SESPARSE instead of VMFSSPARSE (delta) when the base flat VMDK is larger than 2 TB. VMFS5 uses the VMFSsparse format for virtual disks smaller than 2 TB.
VMFSsparse is implemented on top of VMFS, and I/Os issued to a snapshot VM are processed by the VMFSsparse layer. Technically, VMFSsparse is a redo-log that starts empty, immediately after a VM snapshot is taken. The redo-log grows to the size of its base vmdk, when the entire vmdk is rewritten with new data after the VM snapshotting. This redo-log is just a file in the VMFS datastore. Upon snapshot creation, the base vmdk attached to the VM is changed to the newly created sparse vmdk. This is nothing but the Delta files.
From vSphere 6.5, SEsparse is a default format for all delta disks on the VMFS6 datastores. If you have VMFS 5 datastore on ESXi 6.5 hosts, Still it will be VMFSsparse (delta files). SEsparse is a format similar to VMFSsparse with some enhancements. This format is space efficient and supports space reclamation. With space reclamation, blocks that are deleted by the guest OS are marked and commands are issued to the SEsparse layer in the hypervisor to unmap those blocks. This helps to reclaim space allocated by SEsparse once the guest operating system has deleted that data.
When I create the Snapshot of the Virtual machine “vcsa-demo-1” which is running on ESXi 6.5 and VMFS 6, You can notice that delta disk format is “VMname-000001-sesparse.vmdk”. I cannot find any delta disk with “vmname-000001-delta.vmdk”

I took the snapshot of the virtual machine “App-1” which is running on ESXi 6.5 but on datastore with VMFS 5. It has delta file with the format “vmname-000001-delta.vmdk”. For sesparse , We need to have VMFS 6 datastore even running on ESXi 6.5

Storage vMotion of VM with Snapshot from VMFS 5 to VMFS 6 Datastore
I took the snapshot of the virtual machine “App-1” which is running on ESXi 6.5 but on datastore with VMFS 5. It has delta file with the format “vmname-000001-delta.vmdk”

VM “App-1” is running on the Datastore with VMFS 5.

Let’s migrate the vm with snapshot from VMFS 5 to VMFS 6 datastore.

Storage vMotion of the virtual machine “App-1” is completed.
Virtual machine with snapshot is running on VMFS 6

Prior to Storage vMotion to VMFS 6 datastore, delta files was in VMFSsparse format (VMname-000001-delta.VMDK). After Storage vMotion to VMFS 6 datatsore, delta file is chnaged to SEsparse (VMname-000001-sesparse.VMDK)

Similar to that, When a VM with a vmdk of the size smaller than 2 TB is migrated to VMFS5, the snapshot format changes to VMFSsparse. You cannot mix VMFSsparse redo-logs with SEsparse redo-logs in the same hierarchy.
That’s it. We are reaching the end to this deep dive article to master VMware Snapshot. I hope that I have covered almost all aspects of VMware Snapshots and its terminologies and will update the article regularly if any new changes to VMware Snapshot. I hope this is informative for you. Thanks for Reading !!! . Be social and share it in social media, if you feel worth sharing it.
Blogger Comment
Facebook Comment