1. Introduction
In this example we will discuss Apache Tomcat Servlet/JSP container’s clustering and session replication related configurations. Apache Tomcat server is lightweight server that is relatively easy to set-up. It has many features that enable high flexibility. Tomcat can be fine-tuned to do well for some traffic, but if your traffic is expected to be large you may need to distribute the traffic over several Tomcat instances that we will refer to as workers sometimes. Thus you may want to set-up a cluster of Tomcat instances.
Having cluster enables you not only to distribute traffic to your web application, it also allows you to provide high availability (explained later) of your web application. To achieve these functionalities you will also need a load balancing server, such as Apache Httpd Web Server. Once you have all these in place you can add session replication to prevent a Tomcat server failure from affecting user’s experience.
There are many possible ways to do clustering and session replication. Some of the most popular schemas for clustering and session replication are when all servers on the same machine or all servers on different machines. There is also options for orchestrator server that distributes load between workers within a cluster. Some of the possible load balancing capable servers are and .
To have session replication across several Tomcat servers you need a front end server that accepts all connections, and then partitions connections to workers in the cluster.
In addition to load balancing server, you need to have session replication manager that is responsible for copying session and maintaining copies “up to date”. Tomcat allows two types of the cluster-aware session manager. First one is DeltaManager which might be slower because it creates more session copies, but it is more reliable in case of several worker failures. The second one is BackUpManager that creates only one copy of a session on some other server, thus if one fails another takes over. Both have advantages and disadvantages. In our example we will use DeltaManager.
2. Environment
In this example 64-bit Windows 7 Professional SP1 was used. JDK 7 for Windows 7 64-bit was installed and configured.
A sample web application was developed on Eclipse Java EE IDE” Version Kepler Service Release 1 based on this example and was extended to enable and demonstrate clustering and session replication.
For a single Tomcat 8 server instance configuration example please refer here. We will extend simple Tomcat configuration and enable it for clustering and session replication, and we will discuss how to do that later. Note you do not have to go through that example, we will do most configuration related discussion we need here, but you can use it as a reference for some steps.
For load balancing Apache HTTP Server 2.4.12 (httpd) with
mod_jk module was used. We will have three Tomcat 8 instances in our server, and they will be deployed on the same physical machine (Windows 7). Since all cluster servers are on the same machine Tomcat’s build in in-memory session replication will be used.
The above environment and technologies were chosen to demonstrate common Tomcat clustering scheme using latest versions of required technologies. For example is one of the recommended modes by Apache for load balancing, and is commonly used in production. In addition is more mature and rich in feature, than other load balancing modules available for Apache Web Server. Also note that all technologies discussed here are free and most of them are open source projects.
Note that in this example we use Windows specific directory path separator “\”, which is different from the one used on Linux like systems. Below are critical directories for the Tomcat that will be referenced to in this example:
- (known as $CATALINA_HOME, where Catalina is the project name of the Tomcat server) is the directory where you have placed Apache Tomcat folder, e.g. C:\apache-tomcat-8.0.20-windows-x64\apache-tomcat-8.0.20 in our example. In addition, Tomcat server can be configured for multiple instances by defining $CATALINA_BASE for each instance of the Tomcat server. By default both folders refer to the single Tomcat server installation.
- is the directory that contains configuration files and related to those files DTDs (Document Type Definition). The files in this folder are used for the server level performance tuning, security, load balancing, etc. We will talk about web.xml configuration file located in this folder.
- is the directory, where the webapps you place in the server are stored.
- is the directory, where a specific webapp is placed, when deployed on the server.
- is the directory, where the webapp’s specific configuration files are placed. Those configuration files override container’s configuration files.
- is the directory that holds web application specific context.xml configuration file.
A sample web application was developed on Eclipse Java EE IDE” Version Kepler Service Release 1 based on this example and was extended to enable and demonstrate clustering and session replication.
mod_jk module was used. We will have three Tomcat 8 instances in our server, and they will be deployed on the same physical machine (Windows 7). Since all cluster servers are on the same machine Tomcat’s build in in-memory session replication will be used.
3. Motivation and Notations
Let’s first look at some terms that will be mentioned in this example, and that will help you understand better the purpose achieved by clustering with session replication.
- is related to server’s ability to handle efficiently many concurrent requests simultaneously. In clustering this achieved by spreading work among servers to have as fast as possible request processing.
- is a technology aimed at distributing request load among a collection of servers.
- is the server that performs load balancing duties by distributing requests among servers on the cluster. Normally the goal of the load balancer is to distribute the work as evenly as possible among available servers. Load balancer (in our case Apache Httpd Web Server) must keep track of the servers on the cluster, and perform a failoverprotocol if needed. Load Balancer with Session Replication provide high availability of a web application, which means if one server fails, another server will take over. Thus the client’s session will not be interrupted. The Load Balancer may also perform role of the first layer of security, and drop malicious requests before they even reach servers. Load Balancing server also provides single point of access to the cluster. Thus the client needs to connect to a single IP address making DNS look-up for the client’s browser easier.
- object and all its fields must implement java.io.Serializable interface as it will be converted to bytecode by JVM to send it to another JVM.
- is when the load balancer remembers, which Tomcat server processes requests from a given client session. Thus all requests from the same client are sent to the same server.
- is mod_jk, mod_proxy, mod_cluster is a mode of a load balancer being used for the web application. Read more here. Those options are known to be implemented by Apache Httpd Web Server, which is used as a load balancer. Read more about for Apache server here. is easier to configure Apache server module for implementing clustering and session replication for Tomcat servers (mostly small clusters). Read comparison on Apache FAQ. We will use as it provides more load balancing features and is a common choice for the production clusters.
- is the set of technologies aimed at providing some guarantees that the application’s service will be available for the clients for the longest possible time. It is also known as web application up-time, and it is usually expected to be 100%. Load Balancer, clustering, and session replication technologies aim at providing high availability to the web applications deployed on the cluster. There are also two levels of failover that relate to high availability and .
- failover is when the server that was serving requests goes down, all subsequent requests to that server are redirected by the to another server.
- failover is related to session replication discussed in this example and requires either session backup or session copying across all servers in the cluster to be configured. If session replication configured, when load balancer redirects requests from the failed server to another server that server will use its copy of the session to continue client’s session from where it was before the failure. Thus the client will not notice any service interruption, which is the goal of high availability strategy.
Why we need clustering and session replication . One of the main advantages of using clustering and session replication is to provide scalability to a web application when demand for provided services increases. Another reason is reliability. For example if one server goes down another server can pick up and continue serving client request based on replicated session. Thus clustering and session replication provide reliability and scalability of your web application. Read more on why and what for clustering and session replication here.
Clustering and session replication is normally used with load balancing server that distributes load to cluster of servers that will process incoming requests. When a load balancing server decides which worker to send the request two it can make such decision in several ways. The way we implement in our example is the load balancer sends requests to the server that accepted first request from the client with the same session id. This mechanism is called sticky sessions.
In general there are two types of sessions. are those that get attached to a specific Tomcat server and any future requests related to that session are serviced by that server. Requests for a not sticky session can be serviced by any server every time request is made. To use sticky session or not to use? If you want reliability via redundancy use sticky session. The choice is between reliability and performance, where non sticky session replication provides higher performance, while sticky session approach provides higher reliability.
Using with , what does it do? It gives a nice fail over feature to your web application. If the server assigned to the session goes down, another Tomcat server will be assigned by the load balancer to pick up requests for that session and will continue serving any requests for that session . This is possible because the second Tomcat server had a copy of the session, thus it was able to continue serving requests as if nothing have happened.
In addition to deciding on type, we need to decide on how we want our cluster to scale. There are several ways to construct your cluster. One of those design constructs is vertical clusters. Vertical cluster of Tomcat instances is when all instances are on the same physical machine, such that you can add Tomcat instances, but you cannot add another physical machine and deploy Tomcat on it. In this example due to limiting hardware, we will discuss vertical clustering design. Please read more on clustering design options and their pros and cons in this article by open logic.
- failover is when the server that was serving requests goes down, all subsequent requests to that server are redirected by the to another server.
- failover is related to session replication discussed in this example and requires either session backup or session copying across all servers in the cluster to be configured. If session replication configured, when load balancer redirects requests from the failed server to another server that server will use its copy of the session to continue client’s session from where it was before the failure. Thus the client will not notice any service interruption, which is the goal of high availability strategy.
4. Example Outline
In this example we will discuss how to configure three Tomcat instances. Once we complete Tomcat cluster set-up, we will need to configure load balancing server for the cluster. We will use Apache Httpd Server version 2.4 for the load balancing as it is free and frequently used with a Tomcat based cluster load balancer. You can download Apache Httpd Server here.
The load balancing technique that we will use in this article is known as software based load balancing. Another technique for load balancing is hardware based and discussed in details here. Load balancer will act as gateway for our cluster, e.g. we will make the load balancing server aware of the Tomcat instances available in the cluster. Later we will discuss how to configure Apache Httpd Server as a load balancer with module.
5. Preparing for Cluster set-up
As mentioned earlier a cluster could be on a single physical or virtual machine. In our case we will create cluster on Windows 7, single physical machine. We will just need to adjust port numbers for each Tomcat instance in the cluster to accommodate for such setting.
First before we set-up the cluster, we need to create a single Tomcat instance and deploy a sample web application to it. Please refer to my previous article on how to set-up a single Tomcat 8 instance on Windows 7.
Regarding sample web application, we will build upon a web application demonstrated in this example. We will extend the application to be cluster aware and to provide response to the client with current time stamp and session id. For the cluster we will use three Tomcat 8 instances. We will kill one of them, and then start it back and we will see the session replication benefit in action as perceived from client’s perspective.
6. Extending Web Application form “Create Web Application Project with Maven” Example
Before continuing, please go to this article, and follow all steps related to setting up the web application with maven.
The final will look like below.
web.xml
01
02
03
04
05
06
07
08
09
10
11
12
13
14
15
16
17
18
19
20
21
22
23
24
25
26
27
28
29
30
31
32
33
34
35
36
37
38
39
<?xml version="1.0" encoding="UTF-8"?>
<web-app
version="3.0"
xsi:schemaLocation="http://java.sun.com/xml/ns/javaee http://java.sun.com/xml/ns/javaee/web-app_3_0.xsd">
<display-name>Archetype Created Web Application</display-name>
<servlet>
<servlet-name><span style="text-decoration: underline;">mvc</span>-dispatcher</servlet-name>
<servlet-class>
org.springframework.web.servlet.DispatcherServlet
</servlet-class>
<init-param>
<param-name>contextConfigLocation</param-name>
<param-value>/WEB-INF/view-resolver-servlet.xml</param-value>
</init-param>
<load-on-startup>1</load-on-startup>
</servlet>
<servlet-mapping>
<servlet-name><span style="text-decoration: underline;">mvc</span>-dispatcher</servlet-name>
<url-pattern>/</url-pattern>
</servlet-mapping>
<context-param>
<param-name>contextConfigLocation</param-name>
<param-value>/WEB-INF/view-resolver-servlet.xml</param-value>
</context-param>
<listener>
<listener-class>
org.springframework.web.context.ContextLoaderListener
</listener-class>
</listener>
<distributable/>
</web-app>
The above web.xml file has only one additional element . This is all we need in web.xml to let Tomcat know that our web application can be distributable in the cluster.
Next we need to add a method to com.javacodegeeks.controller.ApplicationController.java. We add this method mainly for verification of session replication capabilities. All requests for will be mapped to this method. This method will return an html page with the session id of the client who made request, and a timestamp of the current request.
ApplicationController.java
01
02
03
04
05
06
07
08
09
10
11
12
13
14
15
@RequestMapping(value = "/SessRepl", method = RequestMethod.GET)
public String SessRepl(ModelMap model) {
// get session id create automatically by load balancer
String ssId = RequestContextHolder.currentRequestAttributes()
.getSessionId();
// get date, month, year, hour, minute, second, and millisecond
String currDate = new SimpleDateFormat("dd-MM-yyyy HH:mm:ss:SSS")
.format(new Date());
model.addAttribute("msgArgument",
"Maven Java Web Application Project: Success! Session id is "
+ ssId + " current date is " + currDate);
return "index";
}
Finally, make sure to move to folder.
That is it, our web application is ready to be built as explained here.
Once you build it, get file from the folder and copy that war to each Tomcat instance on the cluster.
01
02
03
04
05
06
07
08
09
10
11
12
13
14
15
16
17
18
19
20
21
22
23
24
25
26
27
28
29
30
31
32
33
34
35
36
37
38
39
| <?xml version="1.0" encoding="UTF-8"?><web-app version="3.0" xsi:schemaLocation="http://java.sun.com/xml/ns/javaee http://java.sun.com/xml/ns/javaee/web-app_3_0.xsd"> <display-name>Archetype Created Web Application</display-name> <servlet> <servlet-name><span style="text-decoration: underline;">mvc</span>-dispatcher</servlet-name> <servlet-class> org.springframework.web.servlet.DispatcherServlet </servlet-class> <init-param> <param-name>contextConfigLocation</param-name> <param-value>/WEB-INF/view-resolver-servlet.xml</param-value> </init-param> <load-on-startup>1</load-on-startup> </servlet> <servlet-mapping> <servlet-name><span style="text-decoration: underline;">mvc</span>-dispatcher</servlet-name> <url-pattern>/</url-pattern> </servlet-mapping> <context-param> <param-name>contextConfigLocation</param-name> <param-value>/WEB-INF/view-resolver-servlet.xml</param-value> </context-param> <listener> <listener-class> org.springframework.web.context.ContextLoaderListener </listener-class> </listener> <distributable/></web-app> |
01
02
03
04
05
06
07
08
09
10
11
12
13
14
15
| @RequestMapping(value = "/SessRepl", method = RequestMethod.GET)public String SessRepl(ModelMap model) { // get session id create automatically by load balancer String ssId = RequestContextHolder.currentRequestAttributes() .getSessionId(); // get date, month, year, hour, minute, second, and millisecond String currDate = new SimpleDateFormat("dd-MM-yyyy HH:mm:ss:SSS") .format(new Date()); model.addAttribute("msgArgument", "Maven Java Web Application Project: Success! Session id is " + ssId + " current date is " + currDate); return "index";} |
Once you build it, get file from the folder and copy that war to each Tomcat instance on the cluster.
7. Clustering and Session Replication Technology Review
Just to recap, session replication implies that a org.apache.catalina.Session for the specific client will be copied in its entirety to all Tomcat instances in the cluster.
By default the Tomcat instance is discovered in the cluster using UDP multicast. Read more on multicast here and here.
When deciding on how big your cluster should be, you need to consider expected load on your web application, especially number of simulations users. You also need to take into account your Tomcat settings discussed here, and make sure that each instance has enough computing resources (memory is the most important one) for processing requests.
Note that if your application is very resource intensive and has huge (millions of users) load, then your cluster and session replication configuration will need to be different than the one explained in this example. Yet there are many similarities in configuring large and small clusters.
Just to review what we are trying to accomplish in this example. We have several elements: Apache Httpd server acting as a , ; servers acting as workers serving requests; and session replication performed on the background cooperatively by all Tomcat servers. From developer point of view it is few settings, some performance and availability guarantee, and more servers to maintain. For user it is the same speed of response no matter how many other users are out there, and uninterrupted service even if some servers may fail.
No let’s move to fun part building it all up: the cluster, the session replication, and the load balancer. In a sense load balancer make it all work together, and it could be seen as a conductor because it orchestrates servers and client requests.
By default the Tomcat instance is discovered in the cluster using UDP multicast. Read more on multicast here and here.
8. Setting Up a Cluster
8.1. Setting Up an Apache Httpd Server for cluster management
As mentioned earlier we will use Apache Httpd Web Server as a load balancer. For load balancing capabilities we will add connector module to the server. This module provides interoperability between Apache and Tomcat servers as well as some load balancing functionality. This is a more mature, and load balancing feature reach module, which is often preferred module for production clusters. This module also offers fine grained monitoring and management of the cluster allowing taking offline for maintenance and bringing back online live Tomcat server instances. connector module uses protocol, which is an efficient protocol developed specifically for metadata communication between Apache and other servers.
There are is another newer module that also gains popularity. module is a simple alternative to module, and is easier to configure. There are several variations of this module available for Apache Httpd Web Server. If you are interested in learning more on the difference between and and their functionalities read here, here, and here.
Since we have chosen module, we will need to do a little more setting up than for . We will need to modify Apache Web Server’s main configuration file, and add a new file which will be used to manage Tomcat instances in the cluster.
8.2. Configure Tomcat server instances for cluster
This is a next step for Tomcat instance configuration. I assume that you have done the following steps earlier for each Tomcat instance:
- Download Apache Tomcat 8
- Unzip Tomcat and create two copies of the unzipped folder (thus you will have 3 folders of the same Tomcat binary).
- Add/change some configurations in server.xml as explained below
The directory with copies of Tomcat folders will look like below.

Now, we will need to change the following ports for each Tomcat instance in
- (default 8080) is a port on which Tomcat listens for incoming HTTP requests.
- (default 8005) is a port on which Tomcat listens to shutdown signal.
- (default 8009) this port’s name acronym stands for Apache JServ Protocol. This port is used to map requests based on certain configurations from Web Server, such as Apache Httpd Web Server to a worker server, such as Apache Tomcat.
- (default 8443) is a port used by Apache Tomcat internally for any redirection. There are two XML elements we need to update, when modifying this value, e.g. for AJP, and for HTTP/1.1.
Leave the first Tomcat instance with default values. For each next server, when modifying ports listed above in just add to the default port value, e.g. will become for the second Tomcat instance, etc.
Once you have modified all necessary ports, run automatic Windows service configuration on each server, but make sure you provide different for each Tomcat instance.
For each Tomcat instance go to
and run . One of possible commands would be .
and run . One of possible commands would be .
Thus you will run the following commands,
For Tomcat instance with AJP Port 8009
For Tomcat instance with AJP Port 8010
For Tomcat instance with AJP Port 8011
For Tomcat instance with AJP Port 8009
For Tomcat instance with AJP Port 8010
For Tomcat instance with AJP Port 8011
Below is the result of running above commands for one of the Tomcat instance.

The reason we need to provide different names for each Tomcat service, so that they can be run in parallel as Windows services.
Next, start each Tomcat instance as windows service with the same name as defined in the previous step.
Next, start each Tomcat instance as windows service with the same name as defined in the previous step.
For each Tomcat instance go to folder and run this command:
, where X should be replaced with corresponding number. is a command line directive to run a service with a given name. Read more on the available command line directives for Tomcat here.
, where X should be replaced with corresponding number. is a command line directive to run a service with a given name. Read more on the available command line directives for Tomcat here.
8.3. Installing Apache Httpd Web Server
First go to official Apache web site click on and follow the download instructions. For my case, I had to go to the nearest mirror of the Apache binary download here. Then I clicked on link. Then I read windows related instructions and warnings. I used binary option for the Apache Httpd Web Server. In the download web site, I downloaded .
Once downloaded, unzip the Apache Web Server. Then read html file in the unzipped folder. To simplify configuration move folder to the root of your disk drive, for example .
Now, run as administrator, this is needed to install the server as a Windows service, which is a common practice.
Next, we need to change default port for Apache Httpd Web Server. The default is . We will change it to to avoid conflicts with the ports taken by Tomcat instances.
Go to . Run . We need to change two lines here:
- Find and change it to . Listen allows you to bind the server to specific IP addresses and ports.
- Next find and change it to . ServerName specifies the name and the port that this server will use to identify itself.
Thus you have modified two lines.
Next run in folder to install Apache Httpd Web Server as a service. To start it as a service in the same folder type . Test the server by going to url . You should see a web page with some welcome text. Apache Httpd Web Server is ready.
Please see below running install for Apache Httpd Web Server

Now that you have three Tomcat instances ready to run, and Apache Httpd Web Server ready to run, we can move on to gluing them all together in a nice robust cluster.
8.4. Adding mod_jk load balancing module to the Apache Httpd Web Server
From now on all configuration is targeting at enabling servers to be cluster-aware. In this section we will enable Apache Httpd Web Server to be load balancer, and to know its workers in the cluster.
First we will need to add module to the Apache Httpd Web Server for load balancing capabilities. To get it as binary go to this link. Click on windows link and download . Next, unzip the downloaded file and read the README file in it. Go to Apache’s official website to read about connectors. After you unzip the module place its folder in folder of Apache Httpd Web Server. Next we will add necessary entries to Apache Httpd Web Server’s configuration files to enable module.
The configuration process is not simple as configuration involves both load balancing and proxy related settings.
8.4.1. Configure mod_jk in C:\Apache24\conf\httpd.conf
First we need to configure the module that we just have added by adding the following entries in .
01
02
03
04
05
06
07
08
09
10
11
12
13
14
15
16
17
18
19
20
21
22
| # we need to instruct load of the new moduleLoadModule jk_module C:\Apache24\modules\tomcat-connectors-1.2.40-windows-x86_64-httpd-2.4.x\mod_jk.so# Then we need to create, and point here the path to the worker configuration fileJkWorkersFile C:\Apache24\conf\workers.properties# Then we need to configure and create if needed a folder, where to store information related to logging and memory usageJkShmFile C:\Apache24\logs\mod_jk.shmJkLogFile C:\Apache24\logs\mod_jk.logJkLogLevel info# Now you will need to monitoring of the clusterJkMount /jkmanager/* jkstatus<Location /jkmanager> Order deny, allow Deny from all Allow from localhost</Location># Next configure applications. Map all requests to our web application to the load balancer.JkMount /* LoadBalancer |
Let’s take a closer look at each parameter.
- this configuration directive instructs loading of the module.
- defines the path from which workers configuration file will be loaded for load balancing purposes. Workers in our case are Tomcat server instances. We will populate this file in the next step.
- the path for the shared memory files for the module.
- the path for the module’s log file.
- sets the logging level for the module. Other levels are: debug, and error.
- we use this directive to map all URL patterns related to any and our sample web application to the LoadBalancer virtual worker, which will distribute work among Tomcat workers. To enable load balancing for only specific Java applications modify to mapping /application/*.
JkMount /jkmanager/* jkstatus - this entry is used for security constraints. We will not configure security constraints for our simple example of load balancing.
8.4.2. Configure C:\Apache24\conf\workers.properties file
After configuring httpd.conf, we need to create a workers.properties file. This file will contain configuration for “workers”, where workers are Tomcat instances that will handle client requests. Virtual servers that will handle load balancing and monitoring are also considered by module as workers. The idea of virtual workers is not used in module.
Below is the file for our example. Create this file with the below content.
01
02
03
04
05
06
07
08
09
10
11
12
13
14
15
16
17
18
19
20
21
22
| # First we define virtual worker's listworker.list=jkstatus, LoadBalancer# Enable virtual workers earlierworker.jkstatus.type=statusworker.LoadBalancer.type=lb# Add Tomcat instances as workers, three workers in our caseworker.worker1.type=ajp13worker.worker1.host=localhostworker.worker1.port=8009worker.worker2.type=ajp13worker.worker2.host=localhostworker.worker2.port=8010worker.worker3.type=ajp13worker.worker3.host=localhostworker.worker3.port=8011# Provide workers list to the load balancerworker.LoadBalancer.balance_workers=worker1,worker2,worker3 |
Let’s look at each configuration entry more closely.
- is used to load workers on the Apache Httpd Web Server start up. Requests mapped in httpd.conf can only be mapped to workers from this list.
- in our case the name is a worker string with count, e.g. worker1. Names are case sensitive and should be composed of alphanumeric characters with dashes or underscores. Workers and the directives related to them are one of the reasons is still preferred in production. Read more on possible workers and directives for them on Apache’s official website here.
- with type directive we declare load balancer “lb” or “status” virtual worker type. For the Tomcat workers the type refers to the communication protocol.
- with port directive we declare the port number to access the worker. This is useful in our example as it allows us to have several Tomcat instances running on the same machine. The port value must match the value in
this is the required load balancer directive and is used to associate group of workers (cluster) with the load balancer. You could have multiple load balancers for different clusters. For more advanced load balancer settings please refer to this official how-to.
this list contains list of workers that correspond to Tomcat instances configured for clustering. Note that the names in this list must match the name in jvmRoute attribute in element, which is in file.
8.5 Configuring Tomcat instances for the cluster
Now since we have set up we need to configure each Tomcat instance for our cluster. We will need to perform two steps. The first step will be to enable session replication on each Tomcat instance, and the second step will be to configure the cluster.
8.5.1 Enabling Session Replication Concept
In this example we will set up in memory Session Replication because all Tomcat instances are on the same machine. We will use org.apache.catalina.ha.session.DeltaManager, so that each Tomcat instance gets a copy of sessions on all other Tomcat instances.
The load balancer can ensure that requests are send to the same “worker” each time. We will use to ensure that requests are served by the same Tomcat instance. If is enabled on the load balancer. If a given request is routed to a particular Tomcat instance, all subsequent requests with matching session id will be mapped to the same instance. If this Tomcat instance fails, load balancer will select another worker to continue processing the requests for the given session id. Note that if replication is not used, the session will be lost, but requests will still be served by the next worker. Tomcat’s approach of in-memory session replication depends on the for failover and normal load balancing. This option is enabled by default in module that we have installed and configured earlier.
The element’s attribute enables Load Balancer match requests to the JVM responsible for maintaining state of a given session. This achieved by appending the name of the JVM to the SESSSIONID of the request being mapped. Then the appended name is matched with the name of a worker form the file. When configuring the element you need to make sure that the name of the attribute matches the name in the file located in folder.
8.5.2 Configuring Tomcat Instances for Session Replication
To set Tomcat instances to be part of a cluster, we will need to modify configuration file for each Tomcat instance. in the find and uncomment it. We will add elements in this configuration file as follows.
01
02
03
04
05
06
07
08
09
10
11
12
13
14
15
16
17
18
19
20
21
22
23
24
25
26
27
28
29
30
31
32
33
34
| ... <!-- We added attribute jvmRoute to the existing element --> <Engine name="Catalina" defaultHost="localhost" jvmRoute="[worker_name]"> ... <!-- We uncommented this element and will have many config in this element's body --> <Cluster className="org.apache.catalina.ha.tcp.SimpleTcpCluster" channelSendOptions="8"> <Manager className="org.apache.catalina.ha.session.DeltaManager" expireSessionsOnShutdown="false" notifyListenersOnReplication="true"/> <Channel className="org.apache.catalina.tribes.group.GroupChannel"> <Membership className="org.apache.catalina.tribes.membership.McastService" address="228.0.0.4" port="45564" frequency="500" dropTime="3000"/> <Sender className="org.apache.catalina.tribes.transport.ReplicationTransmitter"> <Transport className="org.apache.catalina.tribes.transport.nio.PooledParallelSender"/> </Sender> <Receiver className="org.apache.catalina.tribes.transport.nio.NioReceiver" address="auto" port="4000" autoBind="100" selectorTimeout="5000" maxThreads="6"/> <Interceptor className="org.apache.catalina.tribes.group.interceptors.TcpFailureDetector"/> <Interceptor className="org.apache.catalina.tribes.group.interceptors.MessageDispatch15Interceptor"/> <Interceptor className="org.apache.catalina.tribes.group.interceptors.ThroughputInterceptor"/> </Channel> <Valve className="org.apache.catalina.ha.tcp.ReplicationValve" /> <ClusterListener className="org.apache.catalina.ha.session.ClusterSessionListener" /> </Cluster> ... ... |
The above modification to must be done for all Tomcat instances that are specified in the file. You need to replace with the corresponding name from the file. Make sure that names and ports in file match with the names and ports in corresponding file.
Let’s look at each configuration entry more closely.
- . This element needs to have defaultHost set to the same value as in workers.properties. We have added attribute jvmRoute to the standard configuration of this element. The value of jvmRoute attribute must match the name of a worker in workers.properties. The jvmRoute value must be unique for every worker added to the cluster.
- . Within this element all other clustering elements are nested. It also supports different clustering related attributes.
The class name in the element is the Java class that provides clustering capabilities that are included with the standard distribution of Tomcat 5.X and higher.
attribute is related to selecting clustering communication method. 8 is asynchronous communication method.- . This element is used for session management by Tomcat. Inside the Cluster element this element defines, which session replication manager to use with clustering. In our example we use , which is a standard cluster-aware session replication manager. It copies sessions from any Tomcat instance to all other Tomcat instances.
attribute prevents a failing Tomcat instance from destroying sessions on other instances within the same cluster. setting allows notification of the ClusterListeners when a session has been modified. - . This element handles all communication between Tomcat instances within a cluster. In our example Channel uses multicast for communication between workers within the cluster. Single point broadcasting could also be configured. This element contains other elements that are responsible for a smaller part of the communication within the cluster.
- . This element defines the address that all Tomcat instances will use to keep track of each other. In this example we have used standard values.
. This is the communication method between Tomcat instances within this cluster. - . This element together with transport element nested inside it is used to configure communication type. In our case we have configured Non-Blocking Input Output NIO type of communication transport.
- . This receiver component, which gets messages from other Tomcat instances’ Sender components. This element could have configuration for addresses, buffers, thread limits, and more. In our example we have configured Tomcat instances to automatically discover each other via an automatically generated address.
- . This interceptor detects delays that may prevent another member from updating its table due to timeout. To prevent that it may provide alternative connection via reliable transport TCP.
- . This interceptor sends messages to a thread pool to send them asynchronously.
- . This interceptor prints out traffic related statistics and provides it to each Tomcat instance.
Interceptors. Interceptors elements are used to add information to the messages passed between Tomcat instances within the cluster.There are more interceptors that you can add for monitoring, reliability, and other purposes. The order in which you define interceptors here is the same order in which they are executed because they are linked list together in the order defined here. Read about interceptors here. - . This element defines the address that all Tomcat instances will use to keep track of each other. In this example we have used standard values.
- . This element is nested in Cluster element to provide filtering. This element has many cluster specific implementations.
ReplicationValve - . This element listens to all messages send between Tomcat instances in the cluster and intercepts some of them as needed. This element behaves similar to interceptors, except that instead of modifying messages and passing them to Receiver component, they are the destination for the messages they intercept.
- . This element is used for session management by Tomcat. Inside the Cluster element this element defines, which session replication manager to use with clustering. In our example we use , which is a standard cluster-aware session replication manager. It copies sessions from any Tomcat instance to all other Tomcat instances.
Once you have added above elements to the of the Tomcat instance, you need to restart it and your Tomcat instance will be cluster enabled. Note that you need to add above to all Tomcat instances, which you want to be part of the cluster, and that value for must be unique within the cluster.
9. Verify
The way we verify our cluster with session replication is by displaying back to the connecting client the session id that is associated with that client, and a current time stamp with seconds, and milliseconds.
For testing first stop all servers if any of them were running. Then start Apache Httpd Web Server as a Load Balancer with module enabled. Then start three Tomcat instances. You need to use different web browsers to test sessions. If you connect to the same web page from the same browser, no matter from which tab it will use your old session instead of creating a new one.
Thus we can use IE, Google Chrome, and FireFox to test our session replication system.
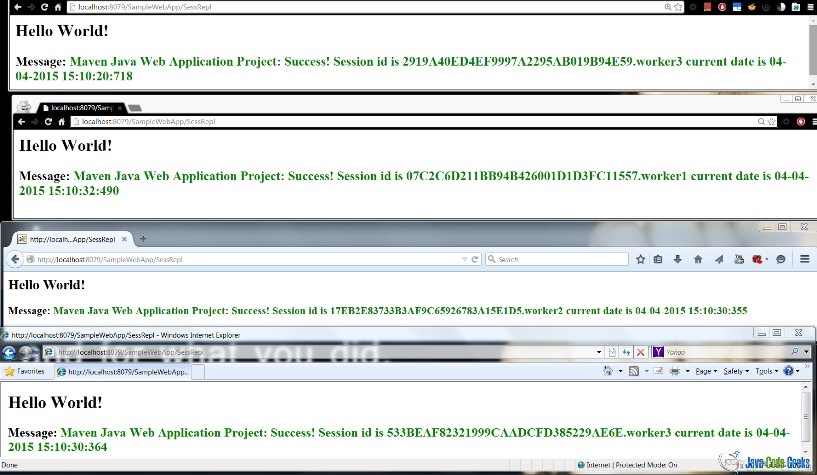
- First connected via Anonymous Google Chrome to Load Balancer. In my case I got assigned to worker 3,
then shutdown worker 3 - Then connected via Google Chrome to Load Balancer. In my case I got assigned to worker 1
then shutdown worker 1 - Then connected via FireFox to Load Balancer. In my case I got assigned to worker 2,
then turned back on worker 3 - Next connected via IE to Load Balancer. In my case I got assigned to worker 3.
- The below image demostrates log for one of the Tomcat instances and the messages related to other workers connecting and disconnecting from the cluster.

-
Finally, updated all connections. All previous sessions were preserved due to session replication, even though worker 1 is still down.The image below demonstrates that the session id is related to different Tomcat instances (workers), even though some of them are down, the session they created is still active.

Thus as we can see from the screenshot and steps described session replication worked.
10. Conclusion
Clustering and session replication need to be configured only once in most cases, but they provide very valuable services. Once your web application becomes as popular as Facebook or Google, you will have to deal with a very large amount of load of requests and connections. There are many ways to deal with the increasing load, and the clustering is one of them. You basically keep adding more workers to the cluster. However, when you have many workers it becomes harder to keep all of them up all the time, thus some mechanism for failover becomes very important. Session replication is a well-known and widely used approach to provide failover guarantees to prevent service interruption. In this example we discussed one of the possible ways to set up cluster with session replication using open source technologies, such as Tomcat. There other possible ways to achieve this goal and below you can find some other good tutorials for doing similar configuration.
11. Download
Download
Download complete web app with tomcat server’s, and Apache Httpd Web Server’s configuration files here: TomcatSessReplSampleWebApp
Blogger Comment
Facebook Comment