Squid is a popular caching proxy for web servers that can reduce network bandwidth and improve application response times. Squid optimizes web traffic by caching frequently requests content to memory, freeing your web servers from having to reprocess requests. Since the request is served from Squid’s memory instead of being reprocessed, requests are returned much quicker allowing your web server to handle much more load.
To see where the caching proxy fits in, review the figure below. You’ll notice that web caching servers, like Squid, sit in front of your web application servers.
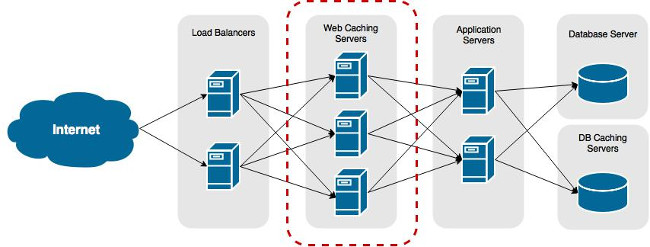
The reason for this is so your caching server can capture all requests before they land on your web servers. Any requests returned from the backend web servers will automatically be cached by Squid, since all traffic must return through Squid to the user’s web browser. Requests already cached will be returned directly from Squid’s memory.
Installing Squid
Installing Squid using Aptitude (Easy)
Unless you want bleeding edge features only found in more recent version, you will more than likely use this method for installation. In production environments stability usually trumps features.
Log on the your Ubuntu server with an account that has administrative rights.
Install Squidsudo apt-get install -y squid3
Installing Squid from Source (Advanced)
Sometimes you need bleeding edge and stability isn’t as important. For this you will have to compile your own copy of Squid.
Download the lastest ‘stable’ release from Squid’s website.
sources.list
deb http://httpredir.debian.org/debian jessie main
deb-src http://httpredir.debian.org/debian jessie main

deb http://httpredir.debian.org/debian jessie-updates main
deb-src http://httpredir.debian.org/debian jessie-updates main

deb http://security.debian.org/ jessie/updates main
deb-src http://security.debian.org/ jessie/updates main
Install packages needed to compile Squid.
sudo aptitude build-dep squid3
Extract the downloaded tar filetar xvf squid-.tar.gz
Change into the newly created directory.cd squid-/
Prepare the source to be compiled on your server../configure --prefix=/usr --localstatedir=/var --libexecdir=${prefix}/lib/squid --datadir=${prefix}/share/squid --sysconfdir=/etc/squid --with-default-user=proxy --with-logdir=/var/log --with-pidfile=/var/run/squid.pid --with-openssl --enable-icmp
Compile the Squid
make
make
Install the newly compiled copy Squidmake
install
install
Configuring Squid
How you configure Squid is ultimately determined by your web infrastructure – is your entire application hosted on a single web server or do different servers handle different parts of your application? For this example, our web application (WordPress) will be hosted entirely on one server.
Blogger Comment
Facebook Comment